Showing posts with label how to sewing. Show all posts

Clothing Organizer Bag

>> Wednesday, December 1, 2010

Well, with almost four kids, I am attempting to streamline our "everyday" things, ya know? I mean, like getting dressed for instance. I'm not ready to pull a Duggars and make everyone wear blue every Tuesday, but still, a little bit of smooth-ness to our daily routine is not unwelcome.


To that end, I decided the best way to get our mornings to be happy times (besides my grumpiness) is to set everything up the night before. But with little boys, "laying out" clothing is simply not an option. It will end up everywhere, all over the floor. 

So, I created these "Clothing Bags," and each night, we'll throw tomorrow's outfit in each bag. It's great! It's adorable, and it's easy. Each bag is assigned a kid, there is no mistaking it. And Sundays? Prechurch? Forgetaboutit! I have big plans for that. We can even put their church shoes in the night before, so there is no, "WHERE IS SPENCER'S SHOE!" I am excited!

To make the bags, I used fabric I already had in my stash, which equaled out to FREE. It really doesn't need to cost a thing! If you haven't got fabric, why not slash up an old pillow case? That'd be SUPER easy!

I did the Nature Bags basically, but on a bigger scale and rather than a strap, I added a little loop to hang on a  hook. Fabulous. 

So, I started with one 15"x15" square and for the back, a 15"x20" rectangle. The rectangle makes the flap, see? Depending on how large your children are, you may need to make a different size. Do what you must. 
From The Diet Coke Diet
I made three at once, cuz I have three boys.

Then I did the monograms. I just used my pinking shears and sewed them on in the middle of the front square piece.
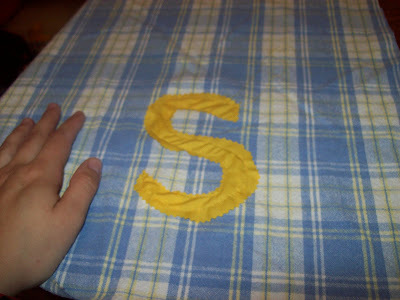
From The Diet Coke Diet

Then the bags got sewn up and the flaps made. I sewed the loops just from scraps from the bags, on the back side, right in the middle.

EASY!
From The Diet Coke Diet
And I use command hooks to hang them on. I purposely hang them up high, because really, I don't want them getting into them once they are packed for the next day.

Some things I learned from this project:
1. Polar fleece DOES NOT work for applique work. No, it does not. It stretches way way way too much. So, on attempt #2 I just used cotton and pinking shears was much more successful.
2. Don't try to sew bags for your kids when they are hungry. It makes Mommy angry, which means I end up needing a seam ripper.

So there it is. An easy way to streamline your life in the mornings.

And if I utterly disappear for a while, well, I'm counting down the days (FIVE) until our fourth is due, so just hang tight. I'll be back, I promise!

Read more...

How to Make Pants

>> Tuesday, November 2, 2010

With no pattern...

Now, don't judge. I realize that after THIS post I have no business talking about how to make pants, but in reality, I really REALLY know how. Scout's honor!

Step One: Choose fabric. For anything 4T or smaller 1 yard will work, anything bigger needs more, obviously. For jammies, flannel is fun. For "real" pants, you can do corduroy, or cotton or denim.

Step Two: Use a pair of pants that you already have as a guide.

From The Diet Coke Diet

Step Three: Use the pants as a guide, and pin them to your fabric, folded in half, to make a one-legged "pattern." Cut the leg out, giving yourself an inch seam allowance, except for the waist, and hem.. Do FOUR inches for the waist, and however much you need for a hem you'll be happy with. (I do about two inches.)

Step Four: Unpin the pants, and flip them over, so you're making ANOTHER leg, two sided. Repeat the cutting out of the pants. You will have two legs that when laid next to each other, look like pants.
From The Diet Coke Diet

Step Five: Sew up each pant leg on the OUTSIDE edge all the way to the top. Sew up each inside leg to the ANGLE (which is the crotch.) STOP sewing before the crotch.
From The Diet Coke Diet

Lookit! Pant-type-looking-thing!

Step Six: Turn one pant leg right side out, and leave the other inside out.
From The Diet Coke Diet

Step Seven: Stick the RIGHT SIDE OUT leg inside the INSIDE OUT LEG and pin the crotch together. And sew the half circle seam.
From The Diet Coke Diet

Woah! Pants.
From The Diet Coke Diet

Step Eight: Do the waist band (some things never change!)

Step Nine: Do the hem.

Step Ten: Wear the pants (or have your kid wear them.)

Here is a stack of little boy pants I made from an old sheet.
From The Diet Coke Diet

Incidentally, this is the same fabric I attempted to create my OWN pants and failed so miserably. But, see??? I can do it. And so can you.

Here are the pants in action, Oliver DESTROYING the kitchen.
From October 2010

Read more...

This is because I love you.

>> Monday, October 11, 2010

Well, folks. I would like to tell you a story. It is story of a pregnant girl who desired new jammies. See, my old pjs are fine, I have like... three pair of pants mixed with the random t-shirts, you know?

But, I felt a hankering deep down inside for NEW ones. I had the fabric, and NO PATTERN, and a flat tire on my van. So I figured, NOT A PROBLEM, I can whip up little boy pants with no pattern in 30 minutes. NOT A PROBLEM.

So, I began.

And well, folks. First, they were too small. This was a marvel unto me considering I'd used MY OWN PANTS as a pattern. But, the original pants had been stretchy. WHOOPS!

TOO SMALL.

Rather than start over (I had enough fabric), I decided to just ADD PANELS.

This, my friends, was a mistake.

Seriously.

But I continued, imaging the fantastic post I'd write for you about how to save a pair of PJs.

But then the crotch was too low, (we call that a "rise"). NOT A PROBLEM said I. I just decided to add ANOTHER panel to to the top.

Except I failed to measure, and came up 5 inches short on the waist. AND I sewed it on upside down and backwards.

AND I thought, "THIS IS A PROBLEM."

So now dear readers, I give unto you, Morgan's epic fail for the week, in pictures:
I am wiping away tears because I was laughing so hard. Don't feel bad for me. It was seriously hilarious. Made more funny because my 16 year old brother was there to witness, and Erin came in there at the end and took the pictures.

From The Diet Coke Diet
And the crotch was still too low. I could barely climb up on that chair. Note Henry laughing at me as well.

EPIC FAIL! 

You're welcome.

ETA: My hand is on my chestal area to HOLD UP the stupid pants. 

Read more...

How to Make A Kid-Sized Snuggie

>> Tuesday, October 5, 2010

Guys, I just wrote this entire post and then accidentally deleted it and then Blogger SO kindly autosaved an empty post. I AM SAD.

Anyway, so, to make a Snuggie, or not to make a Snuggie, that is the question.

Well, if you can get polar fleece material for $5 a yard or less, then yes, it's worth it, for a kid-sized Snuggie.

You can't buy them in the store for less than $15. Another fun reason, is then you have a MILLION patterns to choose from.

So, if you get the fleece on sale, then Snuggie-making is a worthy endeavor. I made 2 kid Snuggies and a fleece blanket for Oliver for $15. A good deal, if I do say so myself.

What you'll need:
1 yard per Snuggie of polar, anti-pill fleece
Thread
Measuring tape and pins

Instructions:
Measure your kid and then decide what size to go with.
Measure shoulder to floor length, chest width and arm length.I ended up making mine 40 inches by 40 inches square.
Cut off any logo or salvage edge before cutting your Snuggie.


There! The blanket-part is done.

SLEEVES:

Using your measurement, make the sleeves by cutting two rectangles of fabric. Add six inches to the length and make them double as wide as you want the finished sleeves. Henry's arm length was 18, so I cut a 24x18 rectangle for each sleeve.
 

Fold the sleeve in half, length-wise (hot dog style!) and sew up the open side, leaving six inches unsewn at the top.


Do this with both sleeves. Leave them inside out, for now.
Cut top part of the sleeve with notches. This will allow it to lay flatter when you sew it on.
From The Diet Coke Diet

Now, to place your sleeves, measure down from the top of your blanket piece 10 or so inches. Then, find the exact middle and pin it. (Mine was 20 inches.) Then find the THIRDS and pin.

So, I had pins in 20 inches, 10 inches and 30 inches. Does that make sense? If your Snuggie isn't 40 inches, then the math part is ALL you.

The THIRDS measurements are your exact middle of each sleeve.

Open up the sleeve on the unsewn edge. Lay the sleeve so the open, unsewn side is open wide and flat on the bottom and the "mountains" are splayed out on the top, like a peacock tail. Make sure it's centered at the pin-mark. So the exact middle of my sleeves lined up at 10 inches and 30 inches. Makes sense, right?
From The Diet Coke Diet
Can you see how that is? I tried oh so hard to make it clear.

Pin and sew. 

When you're done sewing the sleeve on, you'll have, on the OTHER side, this: 
From The Diet Coke Diet
Insert your scissors and cut away the fabric, revealing the sleeve. Cut as close to the seam as you can. Cut as nice and neatly as possible and pull the sleeve through the hole. On the BACK side your sleeve will look like this: 
From The Diet Coke Diet
Trim the edges super short and as neat as can be. On the outside, you'll have a bit of a raw edge showing. But we don't care because it's fleece, and it doesn't fray. NICE!
From The Diet Coke Diet
That picture is horrible, but you can kind of see the raw edge. But it looks smooth. 

Repeat, on the other side.

And SNUGGIE!:
From The Diet Coke Diet
I wish I could show it to you on a kid, but they are for Christmas, so no-go.

OH BUT WAIT! I did manage to coerce my littlest brother to try on Henry's. It's a bit small, but DANG he is ROCKING that Snuggie.
From The Diet Coke Diet

WAIT! One more!
From The Diet Coke Diet
And he's such a good sport!

But really, it's super easy! The sleeves are the trickiest part, but even then,  you can TOTALLY do it. Affordable, custom-made, cute-patterned snuggies. GREAT for the cold weather ahead and cozy movie and book time. 

YAY! It took me about 30 minutes to make one, once I figured out the sleeves. :)

Give it whirl.

Read more...

How to Make A Fairy Skirt

>> Wednesday, September 8, 2010

Okay, I have no daughters. I do not get to sew pretty little girl things too terribly often, so when the time comes, I seize the day.

I give you a mini-tutorial of How to Make a Fairy Skirt (for little girls):

You'll need:
1-2 yards (depending on the size of your fairy) of fabric of really any kind, but silky is the most fun (For a four-year-old niece (CUTE!) I used 1 yard of "satin feel" fabric from Joanns. Gotta love Halloween time, you can find whatever you need.)
3 yards tulle (in whatever color you want)
1 inch elastic for waistband

Start with the How to Make a Skirt With No Pattern tutorial (click!)

BUT do not finish the skirt. STOP after you get the sides and hem sewn. DO NOT SEW A WAIST BAND. DON'T DO IT! WAIT JUST A MINUTE!

From The Diet Coke Diet
I made this skirt with a curvy, flowy shape. I wanted it to be "prance and twirl-able." I literally cut the hem all swirly, instead of straight across. Then I double turned it under and hemmed.

Now, for the "fairy" part of the whole experience. 

From The Diet Coke Diet
Tulle. 

I know! 

3 yards of tulle. 

Cut the three yards into 3 equal-ish strips length-wise. (So, hot dog style.) Ultimately, you're going to end up with three 3 yards pieces of fabric that are about 12 inches wide each. 

3 yards long, 12 inches wide, got it? 

Now, to make those pieces into the skirt topper: 
Run a basting stitch (as big as your machine will go) on the top, along the whole three yards. DO NOT lock the stick. Just let it go. 
From The Diet Coke Diet

Look! Tulle automatically ruffles itself! FANTASTIC!
From The Diet Coke Diet

Do it with all three pieces. 

Next attach the pieces to the skirt, making your way around the whole thing at the top. If you need to, chop the third piece shorter. Bunch and unbunch as needed to make it look the way you want it as you go. 
From The Diet Coke Diet
Depending on the length of your skirt, you'll need to trim the tulle. As you can see, my skirt was shorter by quite a lot.
From The Diet Coke Diet
Now the tricky part, the WAIST BAND to hide the lovely attaching of the tulle. 

Cut your waist band from your under-skirt material. Make it TWICE as wide as you actually want it to be. So, if you have 1 inch elastic, cut it about 4 inches wide. You're going to fold it over TWICE, so it needs to be WIDE. When in doubt, cut it way wider than you need, you can always trim later. 

Right side together, and sew it into a tube. 
From The Diet Coke Diet
Turn it right side out, and fold it over the inside and outside of your skirt, so you now are covering the tulle AND the inside of the skirt, pin and sew, leaving two openings at one seam to run your elastic.
From The Diet Coke Diet
See how as I sew the waist band down, the tulle disappears underneath it?
From The Diet Coke Diet
You're encasing the inside and the outside of the skirt in your waist band. It's making it look smooth.
From The Diet Coke Diet
Got it?
Now, run your elastic on the INSIDE of the waist band. (Remember you folded it over the outside and inside of the skirt, so where you left it open at the seam, run it.)
Sew the elastic and waistband closed.
From The Diet Coke Diet
DONE!
From The Diet Coke Diet
I left the tulle longer than the underskirt just for fun, but do whatever you want with it.

The BEST part of this whole process: making my poor four year old SON be my model to make sure it was all going to fit his cousin. Poor dear was NOT happy with me.

Anyway, one thing I forgot to take a picture of is, if your waist band gets bunchy for whatever reason, STOP and take it out. Otherwise you end up having to sew a patch over the ugly part to cover it up. I can't tell you HOW I know that, but I do. So trust me. Have your seam ripper handy.

Also, make sure you keep track of your tulle as you sew the waist band. I had to take out two different instances where I sewed the tulle in where it didn't belong because it had floated upward. Tulle is tricky. VERY tricky.

But your fairy princess will love it.

:)

Read more...

How to Make Your Own Cloth Diapers

>> Tuesday, August 24, 2010

So, remember yesterday, how I said I was going to try out the cloth diapers from Handmade Home? Well, I did. And here's how it went:

From The Diet Coke Diet
Which means it went well. I kind of didn't follow her "pattern" at all, but I DID use recycled materials.

COOL! 

So, I have toyed with cloth diaper making for years, but ulitimately, couldn't justify buying raw materials for MORE than it cost me to just buy the freaking diaper. 

But NO LONGER. 

I went to Deseret Industries (which is like Goodwill) and got 12 receiving blankets in the "domestics" section. You know, those flimsy little flannel things everyone has but doesn't know what to do with? Right. So, they were a dollar a piece. I chopped them up into 17"x20" pieces, sewed them four thick, with two pieces- of terry cloth in the middle and viola: 
From The Diet Coke Diet
(Poor Oliver kept asking me to put his clothes back on as I was chasing him around with the camera.)

So, to do it, I used (like I said) 12 receiving blankets that I cut up into 17x20 inch pieces. You need four 17x20 inch rectangles sewn together. There wasn't enough flannel to do ALL of the pieces I needed so I started taking the leftovers from the rectangles, and sewing them together for inner layers. You can't see them, and they'll work just as well. 

Then I did two 6"x 20" soakers with baby towel I also bought at DI. Two towels made enough soakers for six diapers with leftovers. (One on top and one on bottom sewed into the diaper.) 

I sewed around the outside and trimmed the edges. DO NOT sew them inside out and then turn them right side out. It absolutely makes the edges TOOOO bulky and they aren't flexible at all. Use pinking shears close to the seams to keep them from fraying. 

(Those of you blessed with a serger, just you know, serge the edges...)

Then I sewed down the soaker on the OUTSIDE to keep it from rolling up inside the diaper. So, while the soaker is inside, the seams holding it in place are on the outside, does that make sense? 
From The Diet Coke Diet
You can kind of see the seams for the soaker on that top diaper, made from planet material. 

So, I used Handmade Home's toddler sizing for these (17"x20") She suggests that you do 12"x13" infant diapers with the soakers being 4"x13". 

Fabrics she suggests are 1. Flannel 2. Old T-shirts (Jersey knit) and 3. Terry cloth. I didn't find cheap enough t-shirt material, so we did all flannel and terry cloth. I am happy with how they turned out. 

From The Diet Coke Diet
By the way, these are chinese prefolds we're making here, so a cover is absolutely required. I didn't have a cover on Oliver for the pictures. But it went on immediately thereafter.

It took me about 2 hours to make six toddler diapers.

Anyway, if you're a cloth diaper-er or want to be one, hit the thrift stores for materials, and get to sewing. Simple, straight seams, some trimming and you've got the cutest little poop rags on the planet. :) 
For the CUTEST babies of course.
From The Diet Coke Diet
 Really, the best thing about this project (For me) was spending $1.50-ish per diaper AND recycling used materials. I feel very very green this afternoon. :)

If you're not a cloth-diaper-er then you can use this same idea to make burp rags. Use the infant size and you can skip the terry soaker. Just sew four layers of flannel together, trim the edges with pinking shears and look! Adorable spit rags for cheap, cheap, cheap!

You're welcome. 


Read more...

Book Review-- Handmade Home

>> Monday, August 23, 2010


Handmade Home by Amanda Blake Soule is written for families and individuals who really want to add that "homemade" flavor to their house and home. Much of it is focused specifically on crafts and sewing projects that either help "make a house a home" OR are projects that parents and kids can do together.

It's a beautiful book! The photographs are taken by the author of her home, her children and her projects. I love this aspect of it. It's not a studio book created by a team of people. It's just her ideas, what works for her and her family, and some great tutorials.

One of my favorite details of Handmade Home is that she is a huge believer in using what you have! She also believes strongly in recycling, repurposing and reusing. Much of her fabric and materials come from thrift shopping and garage-saleing.

The projects I am ITCHING to try (and shall!) are:
Making cloth diapers. I have plenty of infant diapers but am in need of toddler-sized for Mr. Oliver.
The Paper Mache bowls. I think the boys will die of sheer bliss at this project.
Fiber Garland. This is another that kids can help with and I think it'll be fun for the Holidays.
Towel Rug. It's a bathroom rug made from towels. SO cute.

I loved paging through this book this weekend, and am now planning all kinds of fun projects for the kids and I to do together. And the ones that are just for grown-ups (like the Towel Rug) are going to be naptime experiences.

I definitely recommend picking up a copy of Handmade Home! Amanda's first book was The Creative Family, which I haven't read yet. (I bought Handmade Home first because Barnes and Noble had it and they were out of The Creative Family.)

Check out Amanda Soule's blog at www.soulemama.com. You'll be inspired. And get her book! You can order it for WAY cheap in The Diet Coke Store (top right of the home page under the logo.)

Read more...

How to Make a Nature Bag

>> Monday, August 16, 2010

So, we're embarking, at our house, in a year of "homeschool." Henry and Spencer are both of "preschool" age and so we're starting our education slowly. It's going to be a blast, I have decided.

Aside from letters and numbers, I have theories about wee ones and their education. My father says that children today suffer from "NDD" which stands for "Nature Deficit Disorder." I tend to agree. Kids today are bombarded by media and the like and don't get enough free, outdoors time.

We are getting out! The weather is slowly (emphasis on SLOWLY) cooling to the point that being outside and NOT having to be wet is becoming a reality. (YEAH!!) This means it is now time to hit up nature before it gets too cold.

Well, my kidlets kind of love to bring the out-of-doors home with them. More often than not, I am washing rocks and sticks with our laundry. I created little "nature" bags to allow them to explore freely and bring home (don't worry, we're not robbing National Parks) little bits of what they see to further study, or create art with or just have that collection of stuff from outside that all little kids have.

You'll need:
Fabric for the bag. I chose to use PUL which is waterproof. (I had it from diaper-cover-making) If you want to get some, then do, because I love the waterproofing! It allows for dirty WET stuff to come home without making a huge mess. However, a nice canvas or even wool would work just fine. Use what you've got, if you can. I used a tiny little 14 inch portion for each bag, since my kids are small. I'd say that a half a yard would make a BIG bag and a 1/4 would make a smaller size.

If you WANT to put a monogram on the bag, then you'll need fabric and interfacing or felt to do that too. With three boys, monograms are an absolute necessity to avoid fights. If your kids are better-behaved than mine, then feel free to skip the monogram, but it's kind of cute too.

Strapping. You can sew it with fabric if you want (but that takes longer) or you could use bias tape or actual canvas strapping, whatever.

All right, here goes:
Measure out the size width you want. The bag is just one big piece of fabric sewn together, so lay it out, eyeball it, and make sure you've got enough fabric to make the front and the back. The original piece for the bag will be MUCH longer than it is wide.

From The Diet Coke Diet
Then make sure it IS long enough. The deal is, you need to be able to fold up the bottom to make the bag part and the top to make the flap part. Cut it once you're happy with the size.
From The Diet Coke Diet
That picture isn't the best, but you can see that there is a bottom folded up and a top flap?

For the monogram, you know the drill, either fabric + iron-on interfacing, stencil and cut, or felt, stencil and cut. Easy!
From The Diet Coke Diet
Find the middle of the back of the bag, pin and sew. My darn PUL was slippery and so I ended up with slightly crooked monograms. Luckily, my kids don't care. We'll call it "fanciful", shall we?
From The Diet Coke Diet
Next, for the "bag" part. Flip the bottom up, right sides together, and sew.
From The Diet Coke Diet

For the flap, just turn the hem under and sew.
From The Diet Coke Diet

Bag, inside out:
From The Diet Coke Diet

Bag, right side out, before strapping:
From The Diet Coke Diet

Other side, with crooked monogram:
From The Diet Coke Diet

Strapping: I used bias tape (cuz that's what I had) so I sewed down the sides, to keep it closed. If you use fabric, you'll need to fold it under and sew so it's not frayed. Canvas strapping you can just sew on.

Measure your kid, so you make sure it fits cross-wise, like a messenger bag.

And sew on the INSIDE of the bag, right on the side seams.
From The Diet Coke Diet

DONE!
From The Diet Coke Diet
We took ours on their inaugural hike yesterday and they were perfect! Water bottles fit in them, plus all kinds of "outdoor-ness." The boys LOVED having their own pouch and my dad stole Oliver's to take some rocks of his own home. :)

One little bag took me 10 minutes to complete. It's a SUPER fast project.

And as a side note, if you can't sew, you can always find little shopping bags, or the like to use as nature bags. Whether you make it yourself or not, kids LOVE the idea of their "own" bag for collecting.

Go, and fight NDD while having fun with your kiddos.

Read more...

More Moms Just Like Us

A Little Disclaimer

We do not represent, advertise or work for Coca-Cola Classic at all, in any way, shape or form. The images seen here are the sole property of Coke, and we borrowed them off Google Images. "The Diet Coke Diet" is NOT AN ACTUAL diet. Good grief people. Of course it isn't. Man can not live on Diet Coke alone. Woman on the other hand...

  © Blogger template Simple n' Sweet by Ourblogtemplates.com 2009

Back to TOP